— Boomi Documentation
Copying Boomi processes offers several important benefits, particularly for businesses and IT professionals working with Boomi's integration platform. These advantages include:
- Efficiency and time savings
- Consistency and standardization
- Reduced errors and improved accuracy
- Resource optimization and scalability
- And more
Copying Boomi processes is a very common task in Boomi, as many Boomi integration processes are similar to the ones that you have already built. But it is important that you follow best practices and avoid potential pitfalls in copying a Boomi process.
Here is the step-by-step tutorial, with commentary from CEO and Founder, Larry Cone.
Step 1: Create a New Folder to Hold the New Boomi Process Set
Your goal is to create a new Boomi process by copying an existing process. Ensure that the existing process is free of errors before embarking on this step. Next follow these steps:
- Create a new Folder to hold the new process set. An integration at the business level often contains multiple processes. These processes will use common components, and should be housed in a single folder. An example is a Customer integration which might contain both customer level and contact level processes.
- Expand the Component Explorer panel on the left, if it is not already expanded
- Find the Folder which should contain the new folder in the component explorer panel on the left
- Pull down the blue tab, and select New Folder
- Name the new folder
Need help on this step? Contact the Boomi experts at Kitepipe.
Step 2: Copy the Boomi Process
Copy the Process most like the one you want to build. Boomi processes have patterns, and you are looking for the one that has a similar pattern of Connectors, maps, and error handling. Processes with the same endpoints (Netsuite and SQL, for example) often have the same step pattern. Follow these steps:
- Find the source process in the Component Explorer
- Pull down the blue action tab on the process, and select Copy
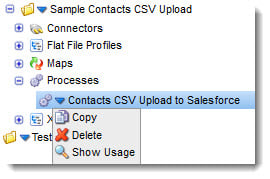
Alt text: Screengrab of the Copy Boomi Process Step
- UNCHECK the Copy component Dependents. A Boomi process contains a hierarchy of components, can be 15 or 20 in one process, many of them shared across processes. Usually you DO NOT WANT copies of them, you want to reuse existing components. If you Copy component Dependents, you will end up with duplicate connectors, connector operations, profiles, etc. Instead, you will carefully copy just the ones you need to change. This is especially true if you are copying a Process from the same folder, as you will end up with duplicates of everything in the folder.
- Fill the Destination folder with your newly created folder location
- Click OK to Copy the Process
Need help on this step? Discover Kitepipe’s full range of services to support your project.
Step 3: Change the Basics on Your New Process
- Find and open (double click) the new process
- Immediately change the name in the blue header, and click save. Until you do this, you have two processes with the same name - dangerous!
- Unlink the destination connectors by dragging in Stop Steps, and moving the flow connection arrow from a post or update connector to the stop step. This will make sure nothing gets updated until you are done with changes and ready to reconnect the end points. It also visually shows you that you are looking at a process in progress. When you have three or four processes open that all look alike, you can get confused. Save the process.
Need help on this step? Contact the Boomi experts at Kitepipe.
Step 4: Swap out the Connector Steps: Connectors, Operations, Profiles
- Open each Connector configuration, and review the Connector and the parameters. Swap out the Connector, if needed.
- Open the Connection operation. Unless you are pulling the same table, view or object, the Connector Operation must be new. Use the plus sign to create a new operation
- Name the new operation, and save (should save into your new folder, but check the path on the upper right).
- Use a common profile, or make a new one. In most cases, the table, view or API will let you import a profile definition to create a new profile.
- Best practice with APIs and Tables is to profile the entire record. Fewer changes later when you need another field. Use a subsequent map to pare down the fields to those you want. For specific assistance with APIs, Kitepipe can help.
- If you have to create the profile by hand, look for an example file (csv or xml) to import - complex xml profiles are tough to build by hand.
- Do the same with the other connectors, and build the operations and profiles you need.
Step 5: Review Each Map and Update
- Maps look like Process steps, but they are not, they are separate objects. A common error is to modify a shared map accidentally. The maps in your new process also belong to the copied process, so they must be replaced.
- Open up each map and review it - you will either use it as a shared component, copy and modify (if it contains useful mapping and logic), or make a new one.
- To use as a shared component, do nothing. The Map should be in a shared or common components folder if it is shared
- To make a new Map, use the configure tab from the existing map and the Plus button to start a new map. Add profiles, and save
Need help on this step? Contact the Boomi experts at Kitepipe.
Step 6: How to Copy and Modify A Map
To copy and modify A Map, you need to Update Process Steps. Many steps in the process (decisions, program, properties) live with the Process, and get copied with the process. Open up each one, and modify. Program steps can have connectors as well, so swap those out if needed. Next, follow these steps:
- Go find the Map in the explorer, and copy it using the blue actions tab to your new folder.
- Do not use the Copy tab on the map in the process layout, this makes a duplicate step on the map, but does not copy the object.
- Leave the copy components checked - this will copy any map functions, and the profiles. Go back to the process, and use the Configure tab on the old map step to replace it with the new map, which you will find in your new folder with the same name. Open the new map, check the path to make sure it is the copied one, and rename it and save.
- Immediately find and delete any copied components you won't use. Probably one or more of the profiles that were copied. Look at the profiles in the explorer in your new folder, and delete unused ones with the blue action tab. If you don't do this immediately, it is easy for you to end up with five or ten profiles, and have to undertake a where used analysis to determine which ones are the extras.
- Open the copied map, and replace profiles, modify mappings, and change Map functions.
- Take particular care to open each function or lookup, and change out the connectors and operations. Maps often lookup using connector components, and a common error is forgetting to change out the connectors or operations in the maps.
Need help on this step? Contact the Boomi experts at Kitepipe.
Step 7: Update Query Logic to Match the New Profiles and Operations
After completing the previous steps, it's crucial to update the query logic in your new Boomi process to align with the newly created or modified profiles and operations. This step ensures that your process accurately interacts with data sources and targets based on the changes you've made.
Need help on this step? Contact the Boomi experts at Kitepipe.
Step 8: Turn Off Extensions
Larry Cone recommends this step and says, “I do this to make sure I don't end up running a deployed process without looking at the extensions. You will have to turn these back on if you are using process extensions before deployment.”
For more tips from Larry Cone on Boomi integrations, check out our popular blog, 5 Things To Know Before Starting Your First Boomi Integration Project.
Step 9: Run a unit test, and see what happens!
Once you reach this final step, you’ll know how successful your Boomi export was. A test can look like these steps:
- Execute a unit test in a controlled environment where you can monitor the process execution.
- Observe the process behavior and output, noting any discrepancies or unexpected results.
- Analyze the test results to identify any errors, inefficiencies, or areas that require further refinement.
- Make necessary adjustments based on your findings and rerun the tests until you achieve the desired outcome.
Need Help Copying a Boomi Process?
Copying a Boomi process can be intimidating. However, it is a practical approach that enhances efficiency, consistency, and accuracy in integration tasks. It offers a way to quickly develop and deploy integrations while ensuring high standards of quality and performance. Contact Kitepipe for seamless integrations and support on your next project.